背景知识
kickstart
kickstart是一种无人值守的安装方式。它的工作原理是在安装过程中记录典型的需要人工干预填写的各种参数,并生成一个配置文件(.cfg),在安装过程中,安装程序首先会去查找ks配置文件,如果找到合适的参数,就采用所找到的参数;如果没有找到合适的参数,便需要安装者手工设定。所以,如果kickstart文件涵盖了安装过程中需要设定的所有参数,安装者只需要告诉安装程序从何处取ks.cfg文件,就能实现系统安装的自动化。
kickstart 安装提供一个安装过程自动化的方法,可以是部分自动化,也可以是完全自动化。
PXE
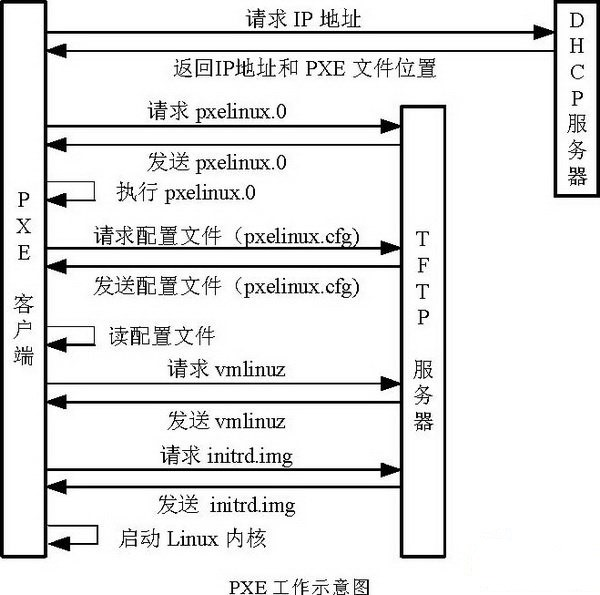
PXE(Pre-boot eXecution Environment,预启动执行环境),工作于Client/Server的网络模式,支持PXE的客户端在启动过程中,能够从DHCP服务器获取IP,结合TFTP(trivial file transfer protocol)等协议可以实现客户端的网络引导和安装。
TFTP
TFTP(Trivial File Transfer Protocol,简单文件传输协议),该协议用来实现客户机与服务器之间的简单文件传输,它提供不复杂、开销不大的文件传输服务。
开始操作
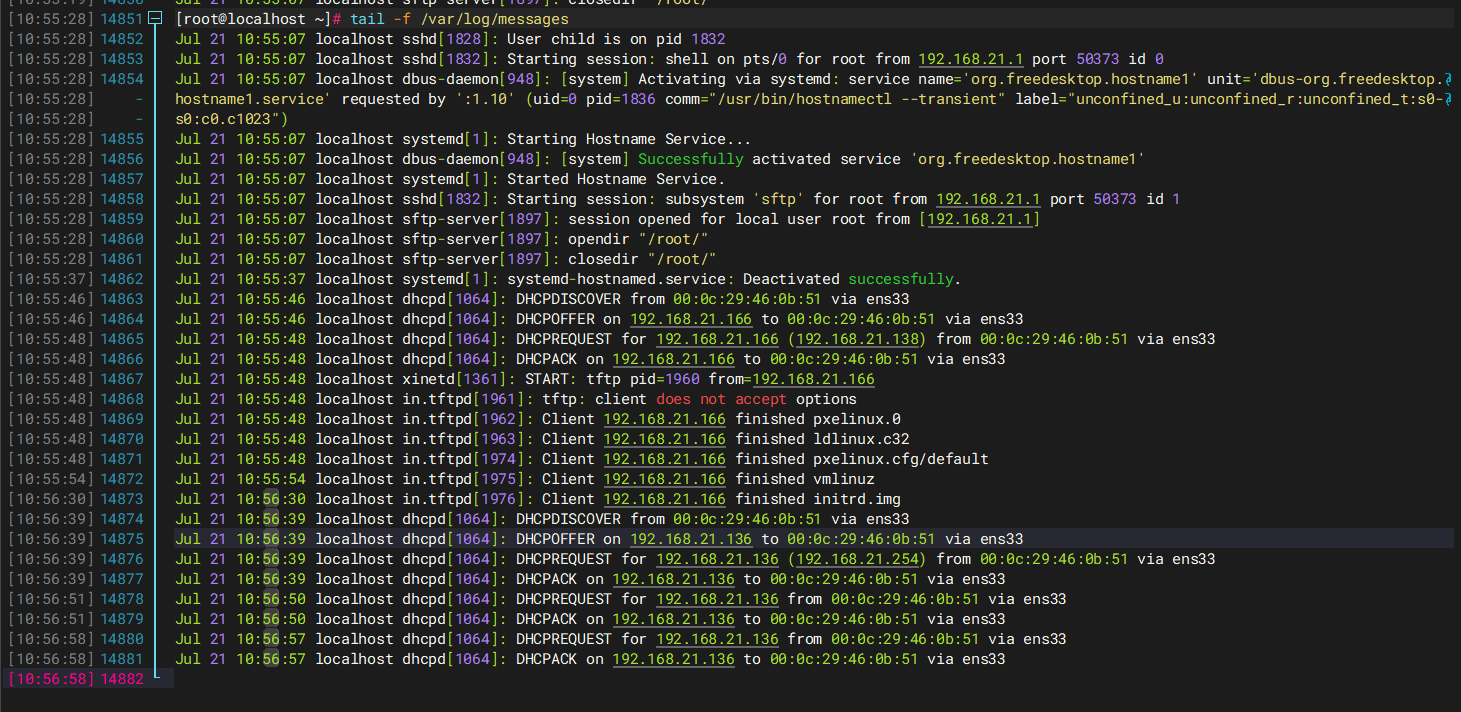
首先我们先准备PXE服务器,PXE服务器需要包含 DHCP、TFTP 和 HTTP 三个服务,启动过程如下:
寻找 DHCP 服务器并获得 IP 地址、PXE 服务器的地址,以及启动文件位置
从 PXE 服务器的 TFTP 服务器中获取启动文件
启动文件执行 Linux 引导序列,从 TFTP 服务器获取 GRUB 配置并显示菜单
在用户选择了菜单条目或者超时选中默认条目后,从 TFTP 服务器载入对应的内核文件
vmlinuz与根文件系统initrd.img引导内核根据 GRUB 菜单条目中的参数,从 HTTP 服务器获取自动安装配置和 ISO 系统镜像
系统进入安装界面并开始安装
此处使用openEuler进行操作。
先关闭防火墙,确保可以正常访问。
# iptables -F配置安装源
# yum install httpd -y
# systemctl start httpd
# systemctl enable httpd
# mount ~/openEuler-24.03-LTS-SP1-x86_64-dvd.iso /mnt
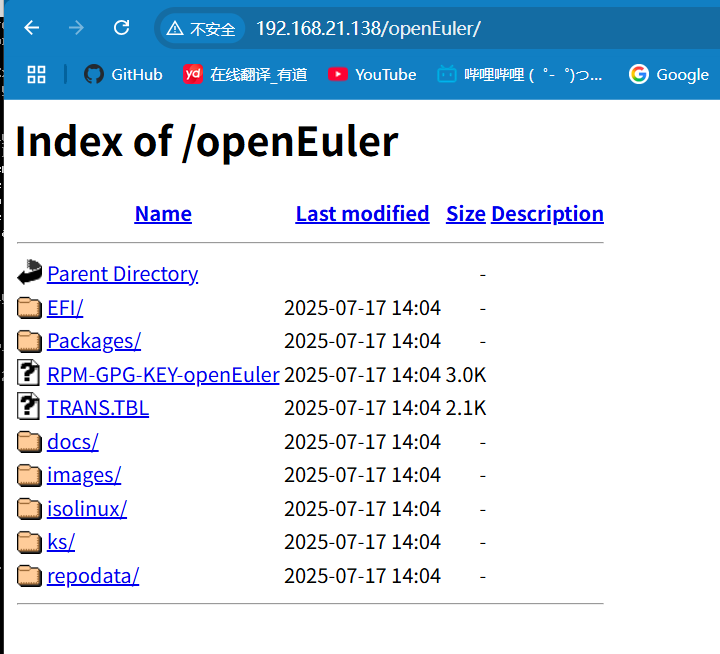
# cp -r /mnt/* /var/www/html/openEuler/此时使用浏览器应该可以看到配置好的安装源
编写kickstart文件
在系统安装完成时,会根据之前的安装过程,在root目录下,生成一个anaconda-ks.cfg文件,我们可以在此基础上进行修改
# mkdir /var/www/html/ks
# vim /var/www/html/ks/ks.cfg编写ks.cfg
# 使用图形化界面完成安装过程
graphical

# 键盘布局配置
keyboard --vckeymap=cn --xlayouts='cn'

# 系统语言设置
lang zh_CN.UTF-8

# 使用网络安装源
url --url="http://192.168.21.138/openEuler"

# YUM 软件仓库配置
repo --name="openEuler" --baseurl="http://192.168.21.138/openEuler" --cost=100

# 网络接口配置
network  --bootproto=dhcp --device=ens33 --onboot=on --ipv6=auto --activate
network  --hostname=localhost.localdomain  # 设置系统主机名为 localhost.localdomain

# 首次启动时运行设置向导
firstboot --enable

# 磁盘分区配置
ignoredisk --only-use=sda  # 忽略除 sda 外的所有磁盘
autopart  # 自动分区

# 清除分区数据
clearpart --all

# 防火墙配置
firewall --disabled

# 系统时区设置
timezone Asia/Shanghai

# 待安装的软件包列表
%packages
vim
nano
git
tar
net-tools
@Java Platform
%end


# 设置 root 用户密码
rootpw --iscrypted $6$BsUeY2XRoF4c1M3G$7KjRHtmK3D6Q0CjL9TLI7NIgJhxj0YQZfxwUXco5y8zl20NaWNEn.881Sm7ss3S6iNnBWPMPlBEO1cPibZ8rg/

reboot  # 安装完成后自动重启系统
密码密文生成方式
# openssl passwd -6 -salt $(openssl rand -base64 12) myPasswd配置TFTP
安装 tftp-server ,并修改配置,将其中的 disable 改为 no
# yum install tftp-server -y
# vim /etc/xinetd.d/tftp

# default: off
# description: The tftp server serves files using the trivial file transfer \
#       protocol.  The tftp protocol is often used to boot diskless \
#       workstations, download configuration files to network-aware printers, \
#       and to start the installation process for some operating systems.
service tftp
{
        socket_type             = dgram
        protocol                = udp
        wait                    = yes
        user                    = root
        server                  = /usr/sbin/in.tftpd
        server_args             = -s /var/lib/tftpboot
        disable                 = no
        per_source              = 11
        cps                     = 100 2
        flags                   = IPv4
}

# systemctl start tftp
# systemctl enable tftp
准备内核文件和初始化镜像文件
PXE网络安装需要vmlinuz 和 initrd.img 文件,将这两个文件拷贝到 TFTP 服务的根目录
[root@localhost ~]# mount ~/openEuler-24.03-LTS-SP1-x86_64-dvd.iso /mnt
mount: /mnt: WARNING: source write-protected, mounted read-only.
[root@localhost ~]# cd /mnt/images/pxeboot/
[root@localhost pxeboot]# ls
initrd.img  TRANS.TBL  vmlinuz
[root@localhost pxeboot]# cp vmlinuz initrd.img /var/lib/tftpboot/
准备引导文件
PXE网络安装需要引导程序文件 pxelinux.0,可通过安装syslinux获取,获取后同样复制到 TFTP 服务的根目录
# yum install syslinux
# cp /usr/share/syslinux/pxelinux.0 /var/lib/tftpboot/
配置启动菜单
# mkdir /var/lib/tftpboot/pxelinux.cfg
# vim /var/lib/tftpboot/pxelinux.cfg/default

default linux
label linux
        kernel vmlinuz
        append initrd=initrd.img inst.ks=http://192.168.21.138/ks/ks.cfg
配置DHCP
# 安装DHCP
# yum install dhcp -y
# vim /etc/dhcp/dhcpd.conf

#
# DHCP Server Configuration file.
#   see /usr/share/doc/dhcp-server/dhcpd.conf.example
#   see dhcpd.conf(5) man page
#
ddns-update-style interim;
ignore client-updates;
filename "pxelinux.0"; # 当客户端通过 PXE 启动时,会从 TFTP 服务器下载此文件
next-server 192.168.21.129; # TFTP 服务器的 IP 地址,客户端会从该地址获取 PXE 引导文件
subnet 192.168.21.0 netmask 255.255.255.0 {
option routers 192.168.21.2; # 网关地址
option subnet-mask 255.255.255.0; # 子网掩码
range dynamic-bootp 192.168.21.100 192.168.21.200; # 动态 IP 范围
default-lease-time 21600; # 默认租约时间
max-lease-time 43200; # 最大租约时间
}

# systemctl start dhcpd
# systemctl enable dhcpd
开始安装
使用PXE启动,开始自动安装,适用于IDC机房中需要对大量裸机进行系统安装的场景